Finding reliable, high-quality cutlery suppliers can be challenging. Poor materials, inconsistent craftsmanship, and delayed shipments can impact your business. Choosing the wrong supplier results in product defects, complaints, and financial losses. Without a deep understanding of cutlery manufacturing, importers and distributors struggle to maintain quality and profit margins.This guide provides a complete overview of cutlery—from materials and production to branding and supplier selection. Whether you’re sourcing for a retail brand or bulk wholesale, this article helps you make informed decisions.
Cutlery quality depends on materials, surface treatments, and production processes. Stainless steel dominates the market for its durability, while silver and titanium target high-end consumers. Understanding different finishes, polishing techniques, and branding options helps buyers select the best supplier. This guide covers everything from material selection to logo customization, ensuring B2B buyers make informed sourcing decisions.
Let’s break down the key aspects of cutlery for businesses, from material selection to manufacturing processes.
Table of Contents
The Definition for Cutlery
Cutlery is more than just utensils; it’s an essential part of dining. Without the right tools, eating can be inconvenient and messy. Understanding cutlery helps you make better choices.
Cutlery refers to knives, forks, spoons, and other tools used for eating and food preparation. It comes in various materials, designs, and functions, making it a crucial part of any kitchen or dining setup.
Let’s explore the world of cutlery, its history, types, materials, and how to choose the best set for your needs.
The Basic Definition of Cutlery
Cutlery, also known as silverware or flatware, includes the utensils used for eating and serving food. The most common pieces are knives, forks, and spoons, but other specialized tools exist.
| Type | Function | Common Materials |
|---|---|---|
| Knife | Cutting food | Stainless steel, ceramic, carbon steel |
| Fork | Picking up and holding food | Stainless steel, plastic, wood |
| Spoon | Scooping and stirring | Stainless steel, silver, bamboo |
| Chopsticks | Picking up food (Asian cuisine) | Bamboo, plastic, metal |
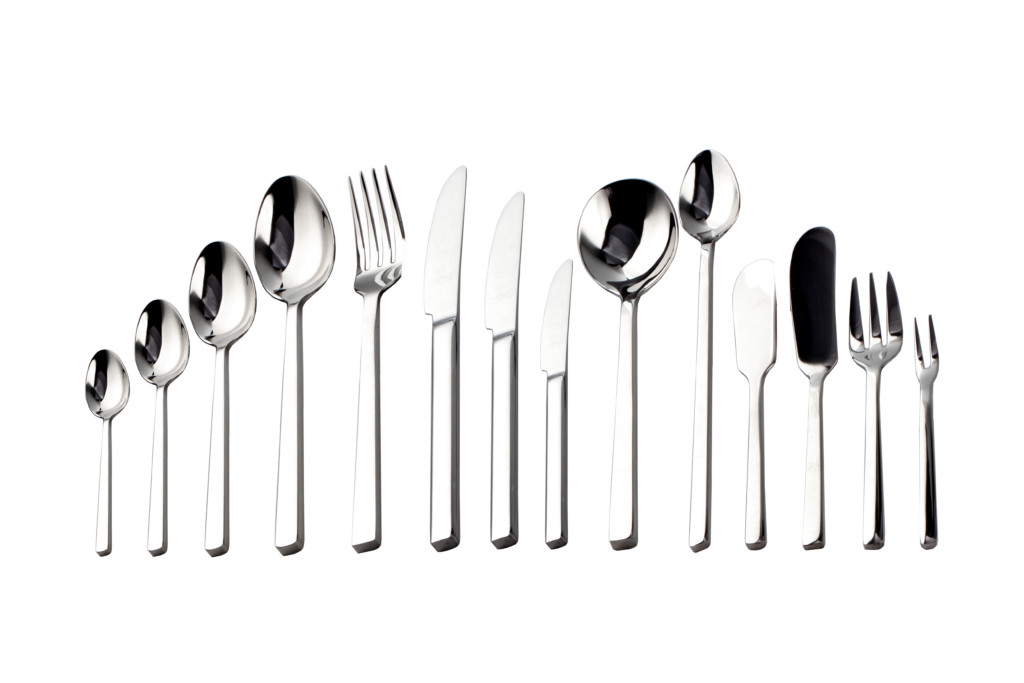
Types of Cutlery and Their Uses
When setting a table, choosing the right cutlery is essential. The wrong selection can ruin a dining experience. This guide explains different types of cutlery and their specific uses.
Cutlery comes in many forms, each designed for a specific purpose. From everyday dining to specialized utensils, understanding their functions can enhance efficiency and presentation.
Below, I will break down various types of cutlery, their roles, and how they impact dining and service quality.
Knives
| Knife Type | Purpose |
|---|---|
| Dinner Knife | Used for cutting soft foods like vegetables and meats |
| Steak Knife | Features a serrated edge for tougher meats |
| Butter Knife | Spreads butter and soft spreads |
| Fish Knife | Designed for eating fish, with a curved blade |
| Paring Knife | Used for peeling and precise cutting of fruits and vegetables |
Forks
| Fork Type | Purpose |
| Dinner Fork | Standard fork for most meals |
| Salad Fork | Slightly smaller, designed for eating salads |
| Fish Fork | Specially designed for eating fish |
| Dessert Fork | Used for cakes, pies, and other desserts |
Spoons
| Spoon Type | Purpose |
| Soup Spoon | Deeper bowl for consuming soups |
| Dessert Spoon | Slightly smaller than a soup spoon, used for sweets |
| Teaspoon | Used for stirring tea and coffee |
| Tablespoon | Larger spoon used for serving |
Choosing the right cutlery ensures efficiency, enhances presentation, and improves the dining experience. Businesses in the food industry must consider cutlery selection carefully.
Raw Materials and Their Benefits
As businesses look to produce high-quality cutlery, understanding the raw materials used is essential. Let’s explore the benefits and considerations of different materials used in cutlery manufacturing.
Raw materials are at the heart of every cutlery product. Understanding the benefits of materials like stainless steel, silver, titanium, and others can help businesses make informed decisions for better-quality products.
Now, let’s dive deeper into each material and its specific advantages.
Stainless Steel
Stainless steel is by far the most popular material used in cutlery. Known for its durability, corrosion resistance, and ease of maintenance, stainless steel has a wide range of applications in kitchenware. It is particularly favored because of its ability to withstand wear and tear, making it ideal for products that see frequent use.
Types of Stainless Steel
| Material | Description |
|---|---|
| 18/10 Stainless Steel | Composed of 18% chromium and 10% nickel, this type of stainless steel is corrosion-resistant, highly durable, and has a shiny finish. |
| 18/8 Stainless Steel | Similar to 18/10 but with slightly less nickel, it offers a good balance between price and performance. |
| 18/0 Stainless Steel | This is a more affordable option with no nickel, which means it is more prone to corrosion but still quite sturdy. |
Benefits of Stainless Steel
Durability: Stainless steel is strong and resistant to physical damage.
Corrosion Resistance: The chromium content makes it highly resistant to rust and staining.
Cost-Effective: Compared to other premium materials, stainless steel is more affordable while still offering great quality.
Maintenance: Stainless steel requires minimal care, making it easy to clean and maintain.
Silver
Silver has been used in cutlery for centuries, primarily for high-end, luxury products. While not as common as stainless steel, silver is still preferred for its elegant appearance and unique properties.

Benefits of Silver
Aesthetic Appeal: Silver cutlery has a sophisticated, timeless look, adding a touch of luxury to any table setting.
Antibacterial Properties: Silver naturally kills bacteria, making it a hygienic choice for kitchenware.
Durability: Silver is a durable metal but may require more maintenance to prevent tarnishing.
Titanium
Titanium is known for its incredible strength-to-weight ratio. It’s lighter than stainless steel but just as strong, which makes it ideal for high-end cutlery designed for both performance and elegance.
Benefits of Titanium
Strength: Titanium is extremely strong and resilient, resistant to bending or breaking.
Lightweight: Despite its strength, titanium is much lighter than stainless steel, making it ideal for users who prioritize comfort.
Corrosion Resistance: Titanium is resistant to rust and corrosion, even in extreme conditions.
Plastic
Plastic is a versatile and cost-effective material used in many types of cutlery, especially for disposable products or cutlery designed for children. Its lightweight nature and ability to be molded into various shapes make it a popular choice.
Benefits of Plastic
Affordability: Plastic is one of the most cost-effective materials for cutlery manufacturing.
Lightweight: Plastic cutlery is easy to handle, making it an excellent choice for disposable or single-use products.
Variety of Designs: Plastic can be molded into almost any shape or color, offering endless design possibilities.
Wood
Wooden cutlery is often favored for its natural look and eco-friendly appeal. It is commonly used in serving utensils and specialty items.
Benefits of Wood
Eco-Friendly: Wood is a renewable resource, making it an environmentally friendly choice.
Unique Appearance: Wooden cutlery often has a rustic, unique design that appeals to those looking for natural beauty.
Lightweight: Wood is lighter than metals, which makes it easier to use in some applications.
Bamboo
Bamboo is another eco-friendly material gaining popularity in cutlery design. Known for its sustainability and strength, bamboo offers a natural aesthetic and is often used in combination with other materials.

Benefits of Bamboo
Sustainability: Bamboo grows quickly and requires fewer resources than many other materials, making it an environmentally responsible choice.
Strength: Bamboo is surprisingly strong and durable, making it suitable for cutlery that needs to withstand daily use.
Natural Aesthetic: Bamboo adds a touch of natural beauty, making it an appealing option for eco-conscious consumers.
Ceramic
Ceramic cutlery is more often used for specialty items, like certain knives or decorative pieces. Though it’s not as common as the other materials mentioned, it has unique properties that set it apart.

Benefits of Ceramic
Aesthetic Appeal: Ceramic cutlery has a distinctive, often artistic look.
Sharpness: Ceramic knives, in particular, are known for their exceptional sharpness and can maintain their edge for a long time.
Non-reactive: Ceramic does not react with food, making it a safe and neutral choice for many culinary applications.
In choosing the right material for your cutlery products, consider the unique benefits and trade-offs of each. Stainless steel, silver, titanium, plastic, wood, bamboo, and ceramic all offer distinct advantages that can enhance the performance, appearance, and sustainability of your products.
Surface Treatment for Cutlery
Surface treatment is a crucial step in the cutlery manufacturing process. It enhances both the aesthetic and functional aspects of the final product. From preventing corrosion to improving durability, different techniques can elevate cutlery designs. But how do you choose the right treatment for your products? Read on to discover the best surface treatments for high-quality cutlery.
Cutlery manufacturers and B2B buyers must understand various surface treatments like Mirror Polish, Satin/Brushed, Sandblasting, and others. Each process enhances product appeal and performance. Selecting the best one will depend on desired outcomes such as shine, texture, and durability.
Understanding surface treatment options for cutlery is essential for producing high-quality products. Let’s dive deeper into the key techniques.
Mirror Polish
Mirror polishing is one of the most sought-after finishes for high-end cutlery. It involves grinding and polishing the surface of stainless steel or other metals to a reflective, mirror-like quality. This process requires precision, as it not only gives the cutlery a glossy appearance but also improves corrosion resistance and provides a smooth, easy-to-clean surface.
How Mirror Polishing is Done
Mirror polishing involves several stages:
1. Initial Grinding: The surface is ground to remove imperfections.
2. Polishing: Fine abrasives are used to refine the surface further.
3. Buffing: A soft cloth is used for the final shine, which gives the mirror finish.
4. Cleaning: Finally, the product is cleaned to ensure no abrasive particles are left on the surface.
| Process Stage | Purpose | Tools/Materials |
|---|---|---|
| Initial Grinding | Removes major surface imperfections | Coarse abrasive discs |
| Polishing | Refines the surface | Fine abrasives |
| Buffing | Achieves high shine | Soft cloth buffing pads |
| Cleaning | Removes residuals | Water or special cleaning agents |
Advantages of Mirror Polishing
– Aesthetic Appeal: The reflective finish gives cutlery a luxury look.
– Corrosion Resistance: A smooth surface makes it more resistant to rust.
– Ease of Cleaning: Polished surfaces are less likely to trap food or dirt.
However, the process is time-consuming and can be expensive, especially when done on a large scale.
Satin / Brushed Finish
The satin or brushed finish is popular for its understated elegance. This treatment involves using a fine abrasive material to create a smooth, matte texture. The surface has a uniform appearance with subtle lines that add depth and character.
Process for Satin / Brushed Finish
The brushed finish is achieved by passing the cutlery through a rotating brush or abrasive belt. The movement of the brush creates fine lines on the surface, giving it a brushed appearance. This technique works well for both functional and aesthetic purposes.
| Process Stage | Purpose | Tools/Materials |
|---|---|---|
| Brushing | Creates fine lines on the surface | Abrasive belts/brushes |
| Cleaning | Removes any abrasives or dust | Water, cleaning solutions |
Advantages of Satin / Brushed Finish
– Durable: It hides scratches and fingerprints better than a mirror finish.
– Non-Reflective: It has a more subtle, matte appearance.
– Better Grip: The texture can offer a slightly improved grip, which is beneficial for some cutlery designs.
Though satin finishes are easier to maintain, they don’t provide the same high-end, glossy look as mirror-polished cutlery.
Sandblasting
Sandblasting is another common surface treatment, especially for creating a textured or frosted look. The technique involves blasting the surface with high-velocity abrasive particles (like sand) to create a uniform matte surface. This technique is often used for decorative purposes or when a rustic appearance is desired.
How Sandblasting Works
1. Surface Preparation: The cutlery is cleaned and prepped for the blasting process.
2. Blasting: Fine sand particles are propelled at the cutlery at high speeds to etch the surface.
3. Post-Processing: The product is cleaned and sometimes coated for extra durability.
| Process Stage | Purpose | Tools/Materials |
|---|---|---|
| Surface Prep | Prepares the surface for blasting | Cleaning solutions |
| Blasting | Creates a textured surface | Abrasive particles (sand) |
| Post-Processing | Enhances durability | Coatings or sealants |
Advantages of Sandblasting
– Textured Surface: Provides a unique, tactile feel.
– Durable: The surface is more resistant to wear and tear.
– Aesthetic Flexibility: Can create a frosted or rustic look.
However, sandblasting may slightly weaken the cutlery, so it’s essential to consider the material’s thickness before applying this treatment.
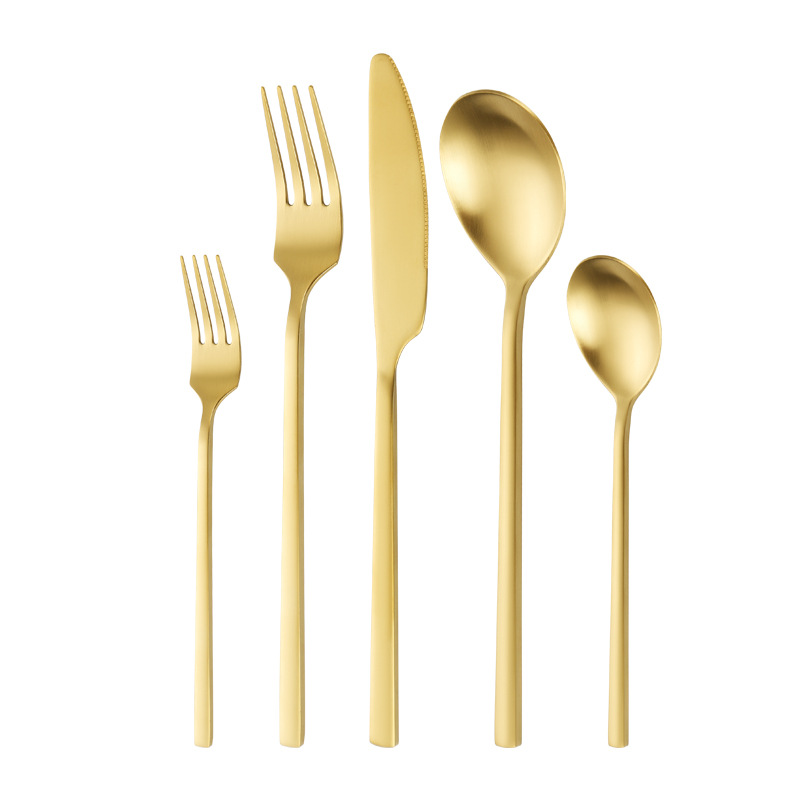
PVD Coating
Physical Vapor Deposition (PVD) is a highly advanced method used to apply a thin film of metal onto the cutlery surface. This technique enhances both the durability and aesthetics of the product. It provides a wide variety of color options, from gold to black, which can cater to modern design preferences.
How PVD Coating is Applied
1. Vacuum Chamber: The cutlery is placed in a vacuum chamber, and a metal is vaporized.
2. Coating Deposition: The vaporized metal particles are deposited onto the cutlery.
3. Curing: The product is heated to cure the coating, making it durable.
| Process Stage | Purpose | Tools/Materials |
|---|---|---|
| Vacuum Process | Prepares the surface for coating | Vacuum chamber |
| Deposition | Applies thin metal film | Vaporized metal |
| Curing | Ensures the durability of the coating | Heat treatment |
Advantages of PVD Coating
– Enhanced Durability: Coatings are hard and scratch-resistant.
– Color Variety: Offers a wide range of colors and finishes.
– Corrosion Resistance: Highly resistant to rust and wear.
While the upfront cost of PVD coating can be higher, its long-term benefits make it a great choice for premium cutlery.
Electroplating
Electroplating is a surface treatment that uses electric current to deposit a layer of metal onto the cutlery’s surface. This process is often used to improve the cutlery’s appearance, adding a layer of gold, silver, or other metals. Electroplating also enhances corrosion resistance.
Electroplating Process
1. Cleaning: The cutlery is cleaned to remove contaminants.
2. Electrolyte Bath: The cutlery is immersed in an electrolyte solution containing metal ions.
3. Plating: An electric current is passed through the solution, causing the metal ions to deposit on the surface of the cutlery.
4. Finishin: The electroplated surface is polished and smoothed.
| Process Stage | Purpose | Tools/Materials |
|---|---|---|
| Cleaning | Prepares surface for plating | Cleaning agents |
| Electrolyte Bath | Ensures consistent metal coating | Electrolyte solution |
| Plating | Deposits metal onto surface | Electric current |
| Finishing | Smooths and polishes surface | Polishing equipment |
Advantages of Electroplating
– Aesthetic Appeal: Adds a shiny, luxurious finish.
– Improved Corrosion Resistance: Helps prevent rusting and tarnishing.
– Customization: Allows for a wide range of metal finishes, such as gold or silver plating.
However, electroplating may not be as durable as other coatings, and the finish can wear off over time, especially with frequent use.
Oxidation
Oxidation involves treating the cutlery with oxygen or chemicals to create a protective layer on the surface. This technique is often used for items like knives, where the added layer can prevent rust while enhancing the overall appearance.
Oxidation Process
1. Chemical Treatment: The cutlery is exposed to a chemical solution that induces oxidation.
2. Heat Treatment: The cutlery may be heated to accelerate the process.
3. Finishing: The oxidized surface is cleaned and polished for a consistent look.
| Process Stage | Purpose | Tools/Materials |
|---|---|---|
| Chemical Treatment | Creates protective layer | Chemical solutions |
| Heat Treatment | Accelerates oxidation process | Heat treatment equipment |
| Finishing | Enhances appearance | Cleaning and polishing |
Advantages of Oxidation
– Rust Prevention: The process creates a durable, rust-resistant layer.
– Unique Appearance: It can create a darkened or matte finish.
– Durability: Oxidized surfaces are less prone to corrosion.
However, the process may not be as aesthetically versatile as others and could lead to a less polished look.
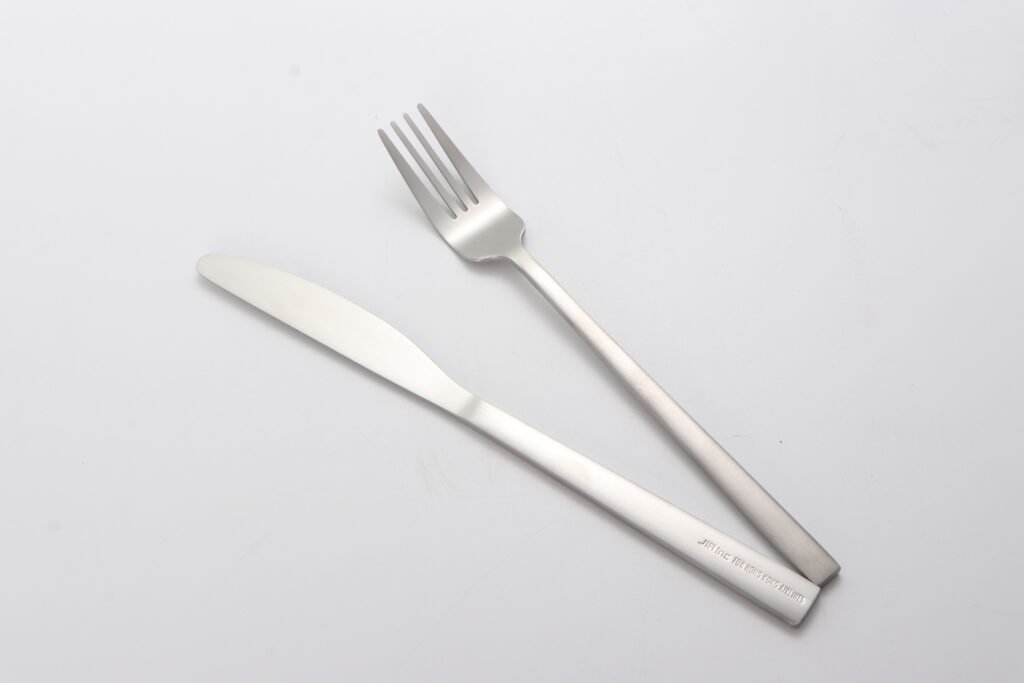
Laser Engraving
Laser engraving is used to add logos, patterns, or other designs onto cutlery. It uses a focused laser beam to etch into the surface, offering high precision and durability.
How Laser Engraving Works
1. Laser Setup: The cutlery is positioned under a high-powered laser.
2. Engraving: The laser etches the design onto the surface, making permanent marks.
3. Finishing: The engraved cutlery is cleaned and checked for quality.
| Process Stage | Purpose | Tools/Materials |
|---|---|---|
| Laser Setup | Prepares for engraving | Laser engraving equipment |
| Engraving | Creates permanent designs | Focused laser beam |
| Finishing | Cleans and inspects the engraving | Cleaning solutions |
Advantages of Laser Engraving
– High Precision: Produces intricate designs with great detail.
– Durability: Engraved designs are permanent and won’t wear off.
– Customization: Allows for unique designs and logos.
Laser engraving is a fantastic option for custom branding and personalizing cutlery, but it may require specialized equipment and higher costs.
Etching
Etching is similar to engraving, but it uses acid or another chemical solution to etch designs onto the surface. This method is often used for creating intricate patterns or branding logos.
Etching Process
1. Masking: A stencil or mask is applied to the cutlery.
2. Acid Application: Acid or chemical solutions are used to etch the design into the surface.
3. Cleaning: After the etching, the product is cleaned thoroughly.
| Process Stage | Purpose | Tools/Materials |
|---|---|---|
| Masking | Protects areas not to be etched | Stencils, masking tape |
| Acid Application | Creates the etched design | Acid or chemical solution |
| Cleaning | Removes excess chemicals | Water, cleaning solutions |
Advantages of Etching
– Fine Details: Etching creates sharp, detailed designs.
– Cost-Effective: It can be cheaper than laser engraving for simpler designs.
– Durable: Etched designs are long-lasting and won’t fade easily.
However, etching can result in a less precise design than laser engraving.
Choosing the right surface treatment for cutlery can elevate its appearance and performance. Understanding options like mirror polish, satin finishes, and others ensures high-quality products for your B2B clients.
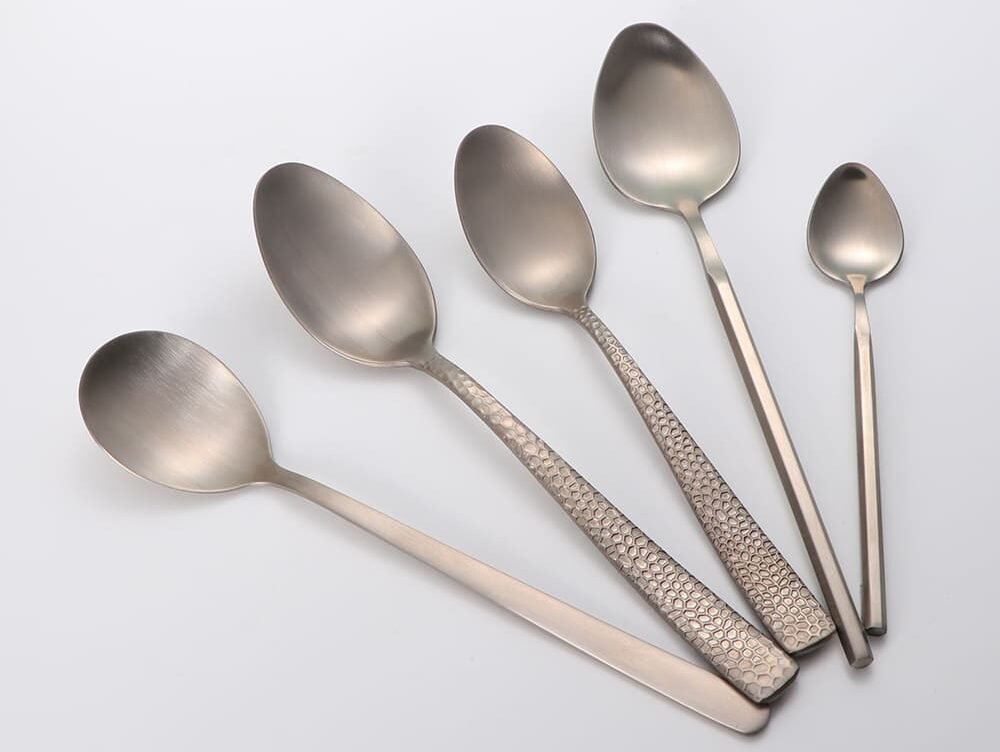
Cutlery Polishing Types and Their Application
Understanding the different polishing types for cutlery is crucial in selecting the right finish for your products. This guide will explain key polishing techniques and their applications to help you make an informed decision.
Cutlery polishing enhances aesthetics and durability. Key types include mirror, satin, sandblasting, electropolishing, and tumbled polishing, each offering unique finishes and applications for diverse business needs.
Let’s explore these polishing types in more detail to help you choose the best one for your cutlery.
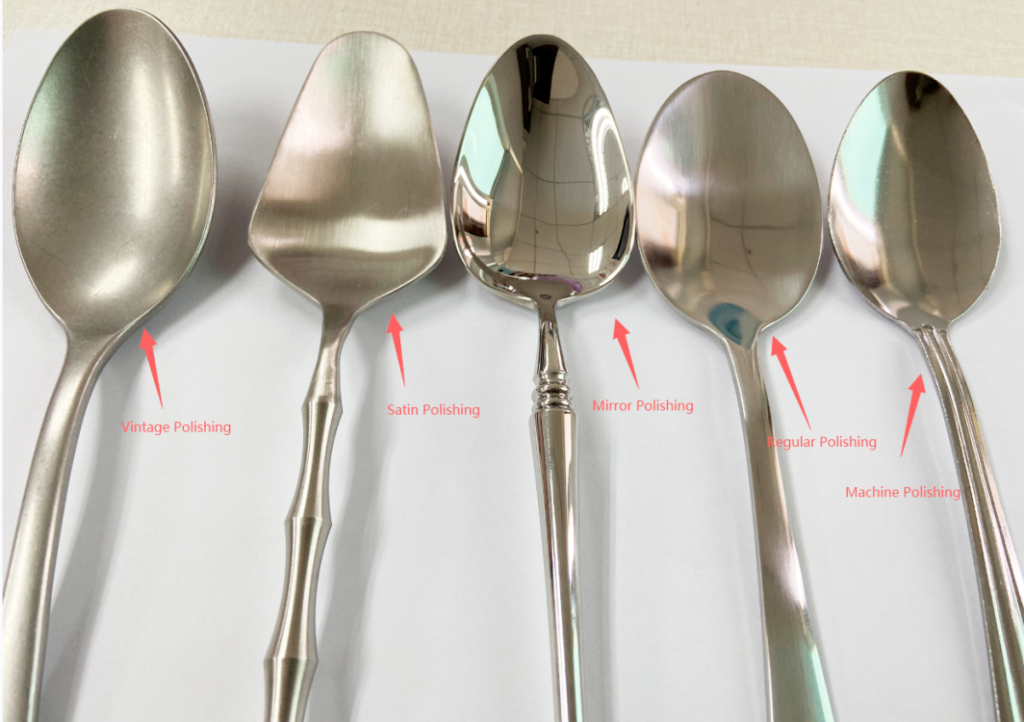
Polishing Types and Their Application
Choosing the right polishing technique is essential in the cutlery business. Different finishes cater to various aesthetic, functional, and durability needs. The main polishing methods are mirror polishing, satin (matte) polishing, sandblasting, electropolishing, and tumbled polishing, each serving distinct purposes in design and manufacturing.
Mirror Polishing
Mirror polishing is often used in high-end cutlery due to its glossy, reflective finish. This method involves a series of abrasive processes, gradually refining the surface until it reaches a highly polished and shiny appearance. Mirror-polished cutlery is highly resistant to stains and corrosion, making it a popular choice for premium products.
– Application: Used for luxury cutlery, dinnerware, and other premium kitchenware where appearance and shine are a priority.
– Benefits:
– Exceptional shine and aesthetic appeal.
– Resistant to rust and corrosion.
– Easy to clean and maintain.
| Feature | Mirror Polishing |
|---|---|
| Finish | Glossy, reflective |
| Durability | High resistance to rust |
| Maintenance | Easy to maintain |
| Primary Use | Premium cutlery |
Satin (Matte) Polishing
Satin polishing produces a smooth yet non-reflective finish that combines both elegance and practicality. Unlike mirror polishing, satin offers a more subtle appearance, making it less prone to fingerprints or visible wear.
| Stage | Brushed Finish |
|---|---|
| Application | Suitable for modern kitchenware and cutlery that requires an understated but sophisticated look. |
| Benefits | – Fingerprint-resistant. |
| – Durable and low-maintenance. | |
| – Ideal for casual and formal settings. |
| Feature | Satin Polishing |
|---|---|
| Finish | Smooth, matte |
| Durability | High |
| Maintenance | Low |
| Primary Use | Everyday cutlery |
Sandblasting
Sandblasting is a technique that uses high-pressure air to spray abrasive particles onto the surface of cutlery, creating a textured, matte finish. This finish is ideal for products that need to withstand heavy use, as it helps mask scratches and imperfections.
| Stage | Sandblasting |
|---|---|
| Application | Often used for outdoor or industrial cutlery, sandblasting is also popular for creating unique, non-slip textures. |
| Benefits | – Creates a rugged, industrial look. |
| – Enhances grip and texture. | |
| – Hides scratches and imperfections. |
| Feature | Sandblasting |
|---|---|
| Finish | Textured, matte |
| Durability | Highly durable |
| Maintenance | Low |
| Primary Use | Industrial cutlery |
Electropolishing
Electropolishing is a form of electrochemical polishing that removes surface material, improving both the smoothness and corrosion resistance of cutlery. It not only creates a shiny surface but also enhances the longevity of the product by making it more resistant to stains and bacteria.
– **Application**: Perfect for high-precision cutlery, medical utensils, and industrial products where hygiene and long-term durability are crucial.
– **Benefits**:
– Enhances surface smoothness and shine.
– Improves corrosion resistance.
– Reduces surface friction, making it easier to clean.
| Feature | Electropolishing |
|---|---|
| Finish | Smooth, shiny |
| Durability | Highly resistant to corrosion |
| Maintenance | Easy to clean |
| Primary Use | Medical and industrial cutlery |
Tumbled (Stonewashed) Polishing
Tumbled or stonewashed polishing involves the use of abrasives or stones to polish the cutlery in a rotating drum. This technique results in a worn, matte appearance, which gives the cutlery a rustic and unique look.
Application: Often used for rustic or vintage-style cutlery, this polishing method is great for casual settings.
Benefits:
- Gives a distinctive, aged look.
- Increases durability and scratch resistance.
- Low maintenance.
| Feature | Tumbled Polishing |
|---|---|
| Finish | Worn, rustic |
| Durability | Very durable |
| Maintenance | Low |
| Primary Use | Casual cutlery |
In conclusion, the right polishing type can elevate your cutlery’s appeal and performance. Mirror, satin, sandblasting, electropolishing, and tumbled polishing each serve unique purposes in manufacturing. Selecting the ideal finish depends on the target market and product function.
Process / Craft
The art of cutlery manufacturing combines precision, skill, and advanced techniques. From blank cutting to the final packaging, each stage plays a vital role in shaping high-quality cutlery products.
The cutlery crafting process involves multiple essential stages, such as blank cutting, extending, trimming, and polishing. Each step requires meticulous attention to detail to ensure the final product meets high standards of durability, aesthetics, and functionality.
Now, let’s take a deeper dive into the intricate steps of cutlery production.
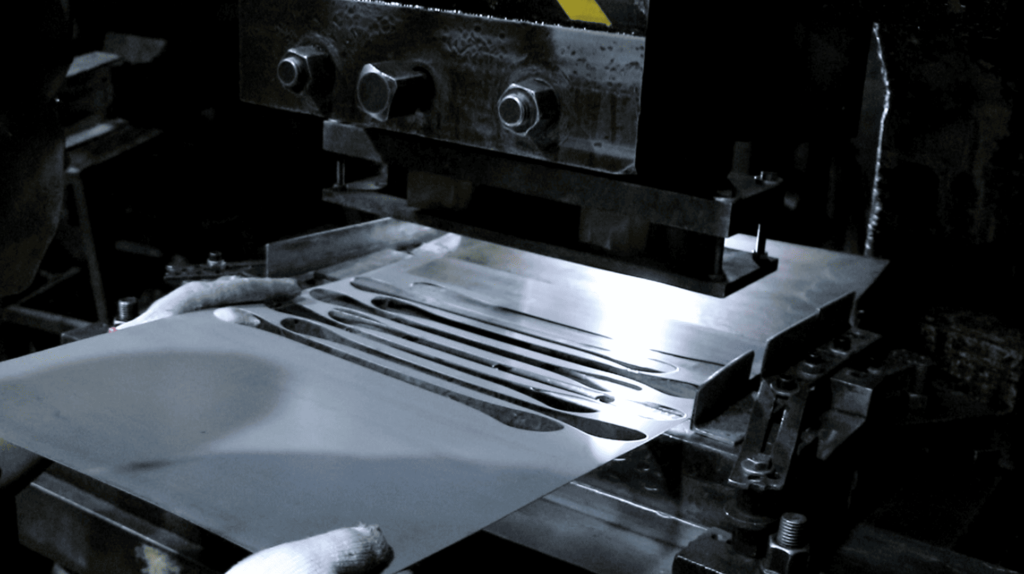
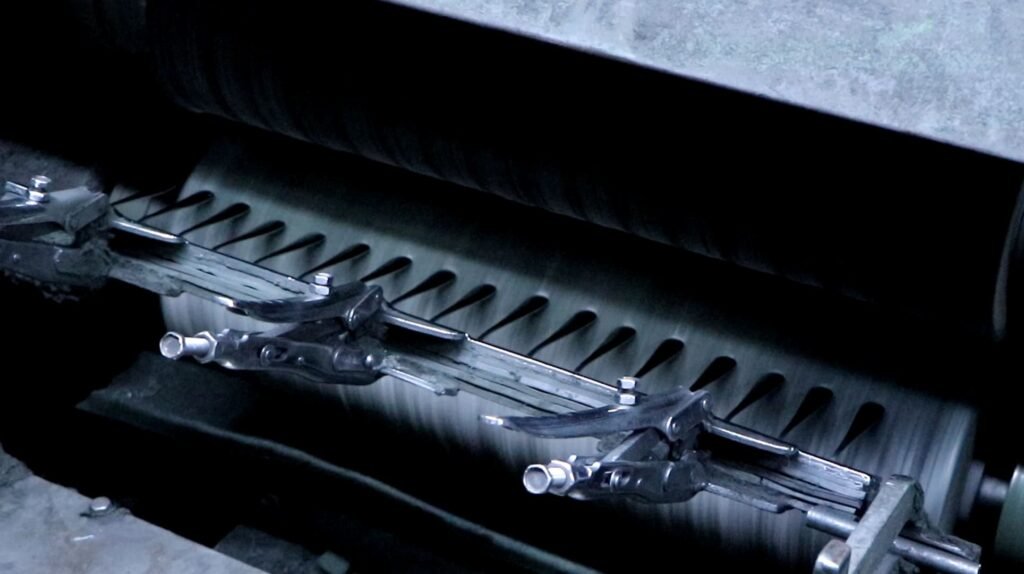
Blank Cutting
The blank cutting process is one of the first crucial stages in manufacturing cutlery. It begins with a large sheet of stainless steel or other metal, which is precisely cut into smaller pieces, or “blanks.” These blanks are essentially the rough shape of the cutlery and will undergo further processing to achieve their final form. The efficiency of the blank cutting process is essential for ensuring consistency across the entire production run.
How Blank Cutting Works
Blank cutting involves high-powered machines that use precision blades or lasers to slice through metal sheets. These machines are designed to handle thick metal and provide high accuracy. The shape and size of the blanks are critical as they influence the cutlery’s design and function in later stages.
| Stage | Description | Key Considerations |
|---|---|---|
| Blank Cutting | Cutting metal sheets into blanks of the desired shape | Precision and speed |
The quality of the blanks determines the overall quality of the cutlery, so any inconsistency during this phase can lead to defects later on. It’s also important to minimize material waste during blank cutting to maintain efficiency and keep costs low.
Extending
Once the blanks are ready, the next step is extending, which involves elongating the blanks into a more refined shape. This process is often carried out using a technique called “stamping,” where the blanks are pressed to form the desired outline of the cutlery. Extending is important for shaping items like knives, forks, and spoons, and it ensures the product has the right proportions for functionality and comfort.
Extending Techniques
There are various methods used for extending cutlery, including hydraulic presses and mechanical stamping machines. The choice of method depends on the material, thickness, and final design requirements. This stage is crucial as it gives the cutlery its basic shape before moving to further refinement.
| Stage | Description | Considerations |
|---|---|---|
| Extending | Elongating blanks to form the desired cutlery shape | Material type and final shape requirements |
Proper control over pressure and time during extending ensures that the final shape is consistent and meets quality standards. Any misalignment or distortion can affect the cutlery’s functionality.
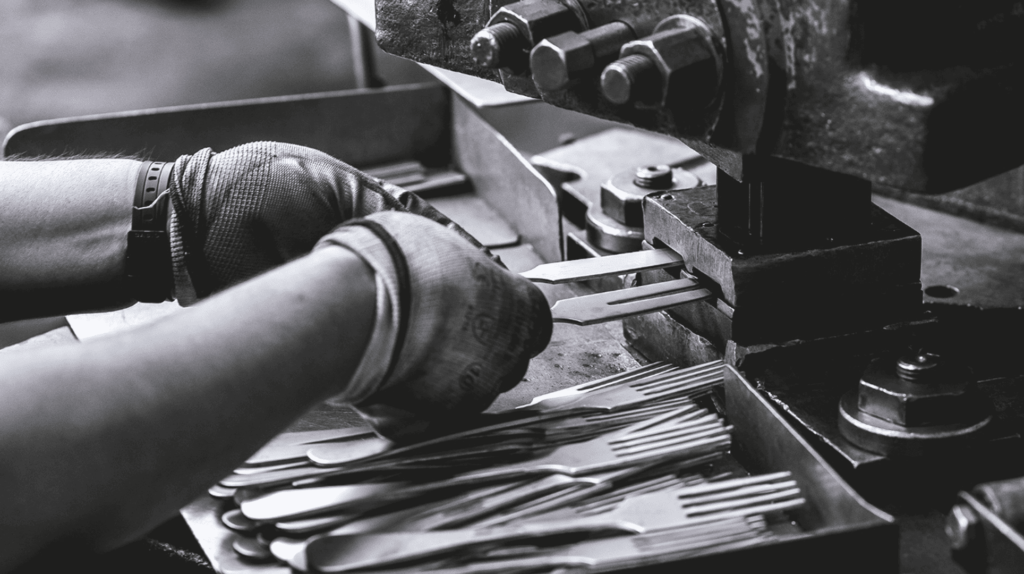
Trimming
Trimming follows the extending process and is the next critical step. In this phase, any excess material or irregularities left after extending are removed. Trimming ensures that the cutlery pieces are smooth and free of rough edges, making them safe and comfortable to use.
Importance of Trimming
Trimming is done with precision machinery that carefully removes the unwanted sections from the cutlery. The process also helps refine the product’s shape, ensuring that it meets design specifications.
| Stage | Description | Considerations |
|---|---|---|
| Trimming | Removing excess material and refining shape | Precision and smoothness |
The trimming process is essential for safety, as sharp edges can cause injuries. It’s also crucial for achieving the clean lines that are typical of high-quality cutlery.
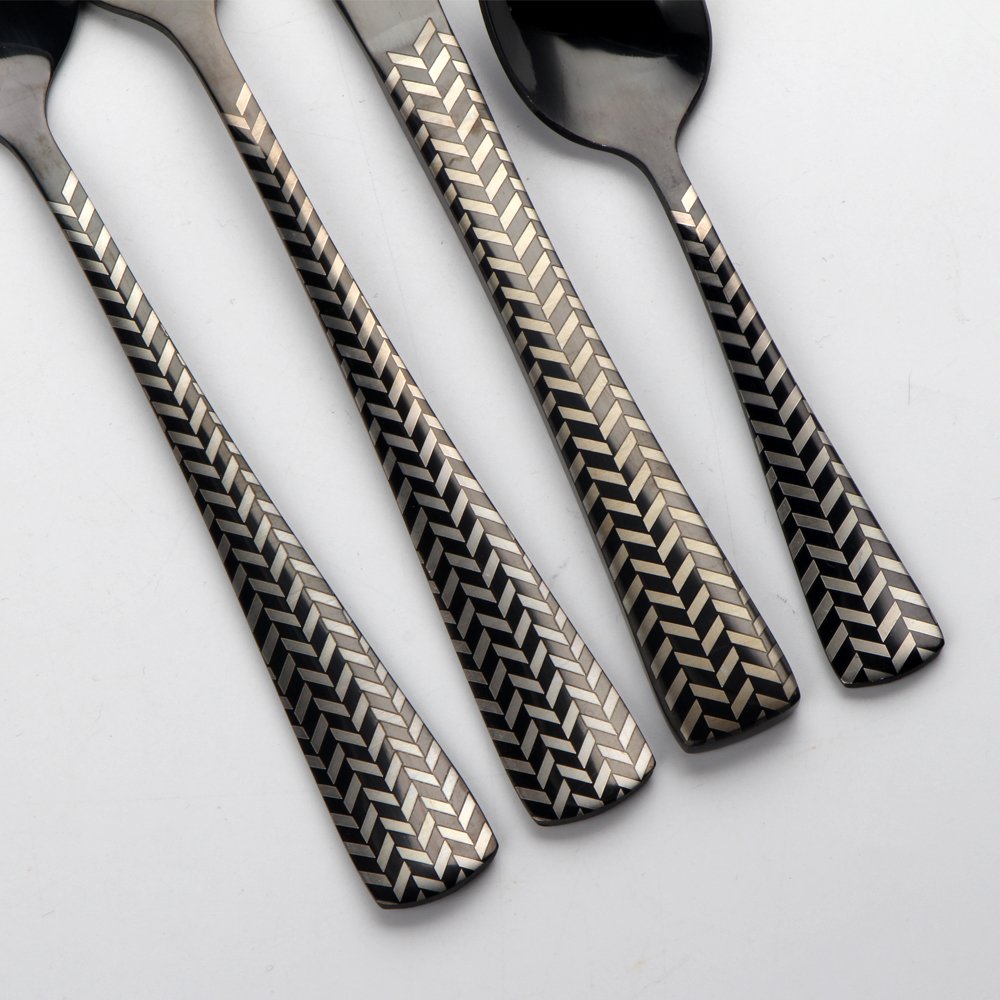
Embossed
Embossing is a technique used to add designs, logos, or other decorative elements to the cutlery. This process can create raised patterns or impressions on the surface of the metal, enhancing the aesthetic appeal of the product.
Techniques in Embossing
Embossing is typically done using specialized tools or machines that apply pressure to the cutlery surface. The design can range from simple logos to intricate patterns that add a unique touch to the cutlery.
| Stage | Description | Considerations |
|---|---|---|
| Embossing | Adding raised designs or logos to the cutlery | Design complexity and placement |
Embossing not only improves the visual appeal of the product but also allows brands to add their mark to the cutlery. This step can be done before or after polishing, depending on the desired finish.
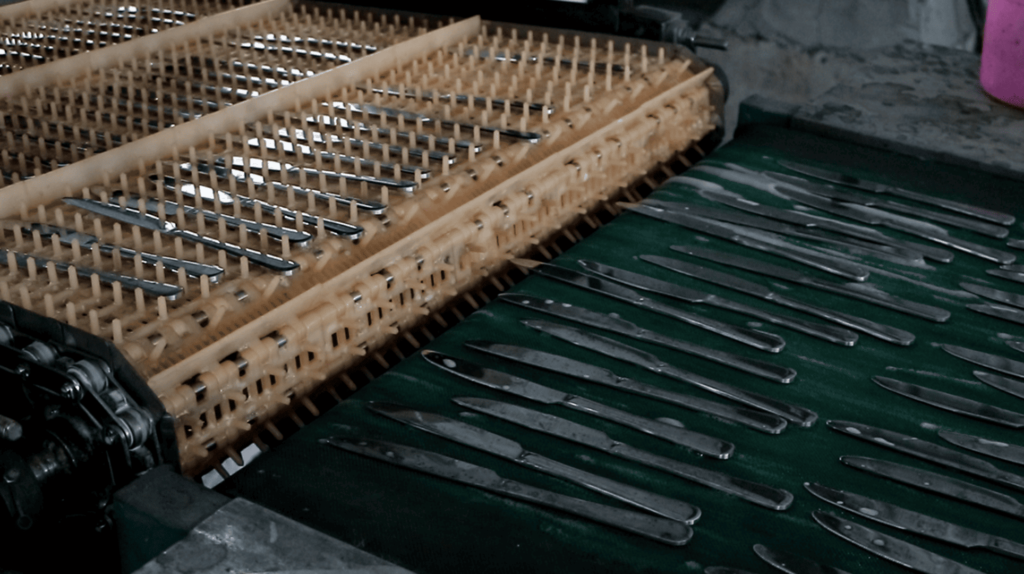
Flat Polishing
Flat polishing is a finishing process where the surface of the cutlery is smoothed to a shiny, reflective finish. This stage is critical for improving the aesthetic and tactile qualities of the cutlery.
The Flat Polishing Process
The flat polishing process involves using abrasive materials, such as polishing wheels or cloths, to smooth out the surface of the cutlery. This step enhances the appearance, removing any roughness or imperfections left by previous stages.
| Stage | Description | Considerations |
|---|---|---|
| Flat Polishing | Smoothing and polishing the cutlery to a shiny finish | Time and pressure control |
Flat polishing gives the cutlery a sleek, professional look and is essential for ensuring the product feels comfortable in the hand. The level of polish can vary depending on the cutlery’s intended use and style.
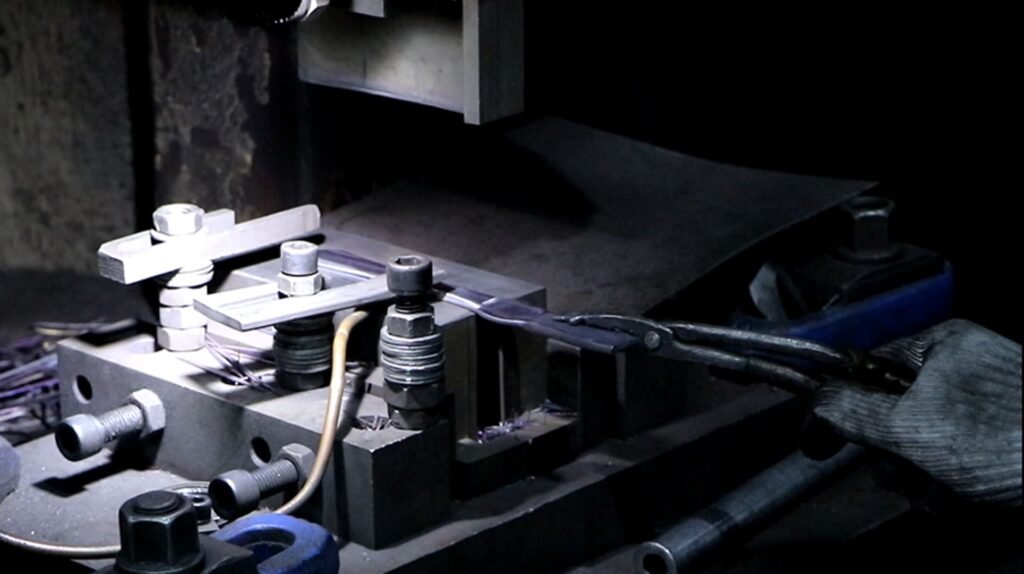
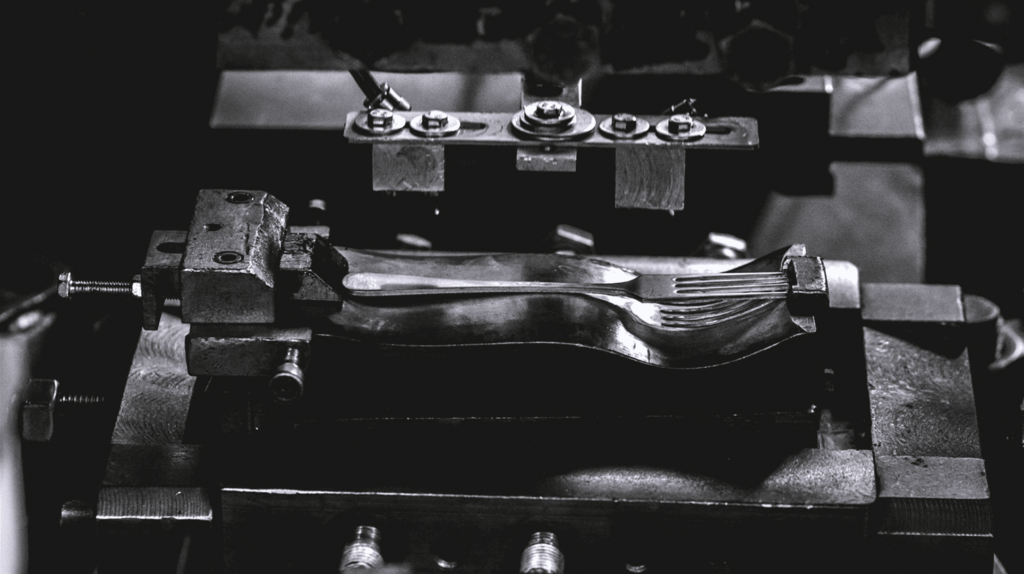
Pressing
Pressing is a critical stage that helps shape the cutlery even further. In this step, high-pressure presses are used to form specific details in the cutlery, such as curves or other complex shapes.
Pressing Techniques
The pressing stage is often combined with extending and embossing to create the detailed shapes required for cutlery. This method requires precision to ensure that the product meets both aesthetic and functional standards.
| Stage | Description | Considerations |
|---|---|---|
| Pressing | Using high pressure to form complex shapes or details | Precision and material behavior |
The pressing process is essential for achieving the fine details that distinguish high-end cutlery. It ensures that the cutlery not only looks good but is also ergonomic and functional.
Bend Polishing
After pressing, the bend polishing process is performed to refine the edges and ensure smooth transitions between the different sections of the cutlery.
The Importance of Bend Polishing
Bend polishing focuses on the junctions where different parts of the cutlery meet, ensuring that the transitions are smooth and the cutlery is comfortable to use.
| Stage | Description | Considerations |
|---|---|---|
| Bend Polishing | Refining the edges and junctions for smooth transitions | Attention to detail |
Bend polishing helps create seamless transitions between the handle and the working part of the cutlery, making the product comfortable to hold and use.
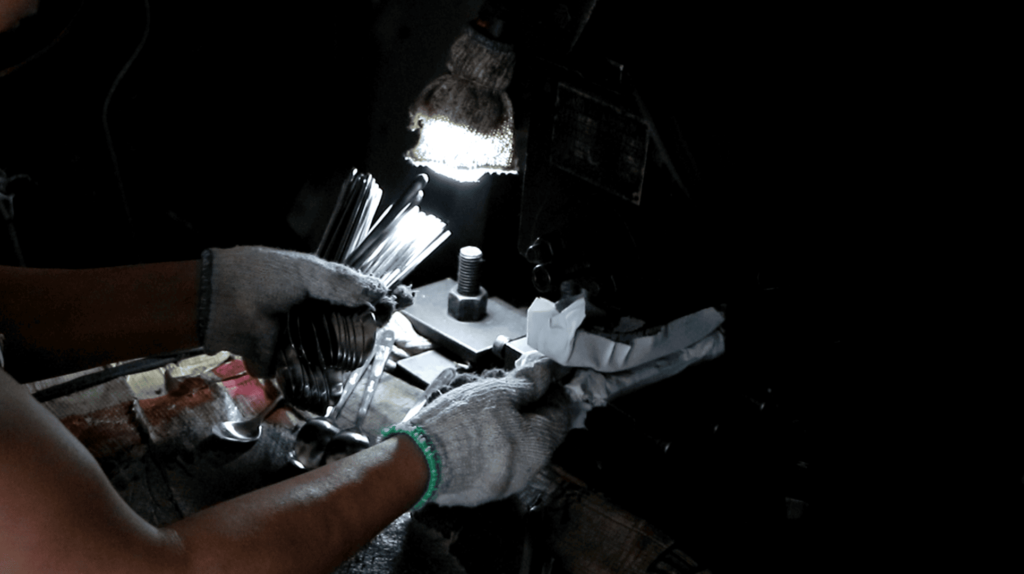
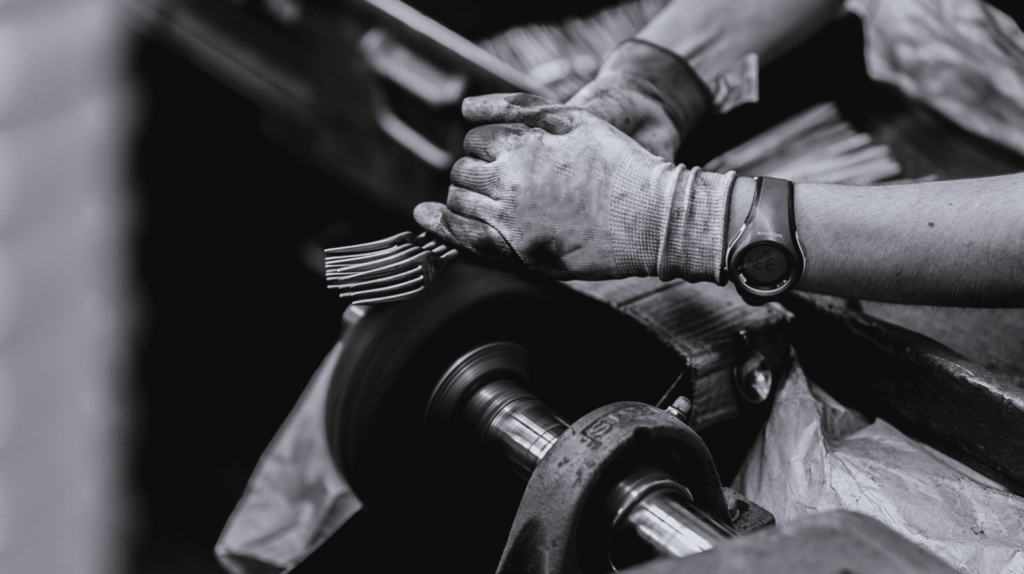
Manual Polishing
Manual polishing is a final touch that can be applied to create a perfect finish. This process is usually carried out by skilled artisans who focus on the finer details that machines cannot achieve.
The Manual Polishing Process
Manual polishing allows for more control over the finishing process, giving artisans the ability to add a personal touch to the cutlery. The process involves hand buffing and polishing the cutlery with specialized tools.
| Stage | Manual Polishing |
|---|---|
| Description | Hand polishing the cutlery for a high-quality finish |
| Considerations | Skill and experience |
Manual polishing is time-consuming but results in a flawless finish, making it a hallmark of high-end cutlery production.
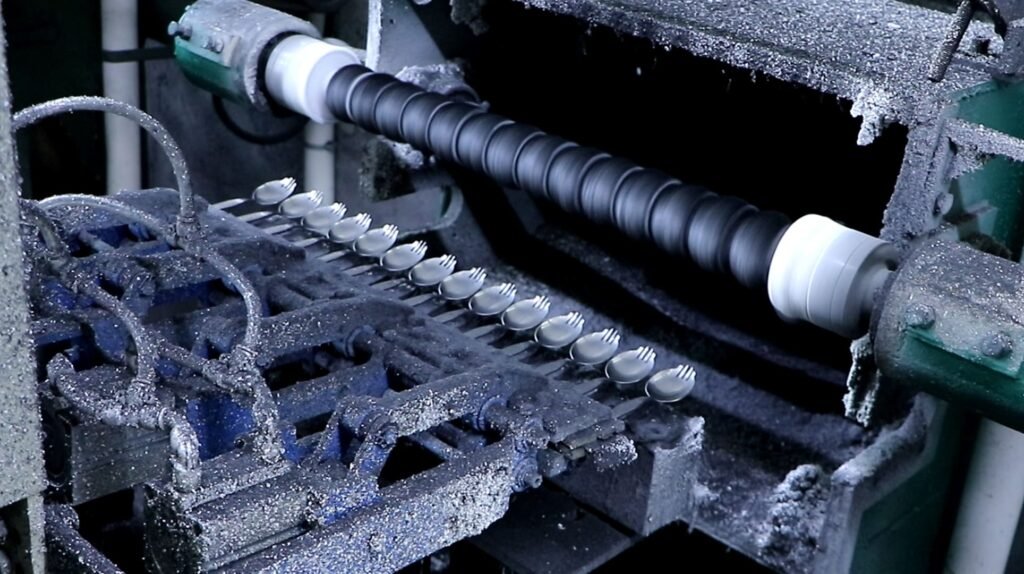
Washing
After polishing, the cutlery is thoroughly washed to remove any polishing residue or oils left over from previous stages. This step ensures that the final product is clean and ready for packaging.
The Washing Process
The washing stage involves using both water and specialized cleaning solutions to remove any traces of manufacturing. The cutlery is then dried thoroughly to prevent rust or corrosion.
| Stage | Washing |
|---|---|
| Description | Cleaning the cutlery to remove any residues |
| Considerations | Thoroughness |
Proper washing ensures that the cutlery is hygienic and safe for use, which is critical for maintaining product quality.
Package
The final step in the cutlery manufacturing process is packaging. Proper packaging not only protects the product during transport but also enhances its presentation to the end customer.
Packaging Techniques
Cutlery is packaged using various materials, from simple plastic wraps to elegant boxes or cases, depending on the product’s market segment. The packaging must be durable, easy to handle, and attractive.
| Stage | Package |
|---|---|
| Description | Packing the cutlery for safe delivery and presentation |
| Considerations | Design and durability |
The packaging must meet both practical and aesthetic standards, ensuring that the product reaches customers in perfect condition.
Cutlery LOGO Types
Cutlery branding matters. Without a proper logo, your product lacks identity, credibility, and differentiation in the competitive market.
Cutlery logos come in various forms, including laser engraving, stamping, and embossing. Each method has unique advantages based on durability, aesthetics, and production feasibility.
Choosing the right logo type depends on material, budget, and branding goals. Let’s explore these options.
Laser Logo
What is a Laser Logo?
Laser engraving is a precise method where a high-powered laser burns a design onto the surface of the cutlery. It creates a permanent mark without affecting the structure of the material.
Advantages of Laser Engraving
– Durability: Resistant to wear, ensuring long-lasting branding.
– Precision: Achieves high-definition details.
– Versatility: Suitable for stainless steel, titanium, and other materials.
Disadvantages of Laser Engraving
| Stage | Engraving |
|---|---|
| Limited Depth | The engraving does not create a deep imprint. |
| Color Limitations | Results in a monochrome design. |
Use Cases
| Material | Recommended? |
|---|---|
| Stainless Steel | ✅ Yes |
| Aluminum | ✅ Yes |
| Plastic | ❌ No |
| Wooden Handles | ❌ No |
Stamping Logo
What is Stamping?
Stamping (also called mechanical engraving) involves pressing or carving a design into the metal surface using a mold or engraving tool.
Advantages of Stamping
| Stage | Stamping |
|---|---|
| Deep Imprint | The logo becomes part of the metal, ensuring durability. |
| No Fading | Unlike laser engraving, stamping withstands heavy use. |
Disadvantages of Stamping
| Stage | Stamping |
|---|---|
| Higher Cost | Requires custom molds. |
| Limited to Metal | Not suitable for plastic or wood. |
Embossed Logo
Embossed logos are created by pressing a logo into the material to create a raised design. This method adds texture and can provide a three-dimensional effect that is visually appealing. Embossing is most commonly used on high-quality cutlery where a more tactile, luxurious feel is desired.
Pros
– Adds a tactile, premium feel
– Resistant to fading
– Suitable for high-end products
– Can be done on a variety of materials, including stainless steel and aluminum
Cons
– Expensive compared to stamping
– Limited design options due to the nature of the technique
– Not as precise as laser engraving
Embossing is often used for premium cutlery brands that want to emphasize their craftsmanship and luxury. It adds a unique element that stands out, providing an upscale appearance to your products. However, due to its cost, it is best suited for limited runs or luxury items.
| Logo Type | Advantages | Disadvantages | Best Suited For |
|---|---|---|---|
| Laser Logo | High precision, long-lasting, intricate designs | Expensive, slower production, requires special equipment | Premium brands, detailed designs |
| Stamping Logo | Cost-effective, fast production, clear marks | Less detailed, fades over time, wears down on softer materials | Mass production, large volumes |
| Embossed Logo | Premium feel, tactile, resistant to fading | Expensive, limited design options, not as precise | High-end, luxury cutlery |
Understanding the differences between laser, stamping, and embossed logos helps you choose the best method for your cutlery business based on cost, quality, and production needs.
Cutlery Care and Maintenance
Are your cutlery sets starting to lose their shine? Proper care and maintenance can significantly extend the life of your cutlery, keeping them in top condition for longer.
Taking care of cutlery is essential to maintaining its function and appearance. Proper cleaning, storage, and occasional polishing can prevent corrosion, staining, and dullness, ensuring the longevity of your investment.
In this part, we’ll guide you through the best practices for cutlery care and maintenance to keep your products in excellent condition for years.
Why Cutlery Maintenance Matters for B2B Buyers
In the cutlery business, the durability and appearance of the products you sell are crucial. Your customers depend on cutlery that is both functional and visually appealing. As a B2B buyer, understanding how to maintain your cutlery ensures that it remains in top condition, reducing replacement costs and enhancing the satisfaction of end-users. Whether you’re supplying restaurants, hotels, or catering businesses, the longevity of cutlery is directly tied to its proper care.
Basic Cutlery Care: Cleaning Techniques
The most fundamental aspect of cutlery care is cleaning. Whether your cutlery is stainless steel, silver, or any other material, improper cleaning can lead to tarnishing, corrosion, and a decline in performance. Here are some key cleaning techniques to follow:
Cleaning Stainless Steel Cutlery
Stainless steel is a popular material because of its durability and resistance to rust. To clean stainless steel cutlery, follow these steps:
– Wash with warm, soapy water immediately after use.
– Use a soft sponge or cloth to avoid scratching the surface.
Cleaning Stainless Steel Cutlery
Silver cutlery is more delicate and requires extra care:
– Hand wash with mild dish soap and warm water.
– Dry immediately with a soft cloth to prevent tarnishing.
– Use silver polish periodically to restore its shine and remove tarnish.
Cleaning Other Materials (Plastic, Wood, etc.)
| Care Instructions | Plastic Cutlery |
|---|---|
| Cleaning | Wash with warm water and mild detergent. |
| Avoid Soaking | Avoid soaking for long periods, as it can cause warping. |
| Care Instructions | Wooden Handles |
|---|---|
| Cleaning | Clean with a damp cloth and immediately dry. |
| Avoid Soaking | Avoid soaking wooden cutlery in water, as it can lead to cracking. |
| Maintenance | Periodically oil the handles with food-safe mineral oil. |
Cutlery Storage: Keeping It in Shape
Proper storage is just as important as cleaning when it comes to maintaining your cutlery. Improper storage can lead to scratches, dents, or tarnishing. Here are some tips for effective storage:
Forks, Spoons, and Other Cutlery
– Store forks, spoons, and knives separately to prevent them from rubbing against each other.
– Use a cutlery tray or drawer insert to organize your cutlery and keep it from getting scratched or bent.
– For long-term storage, keep cutlery in a dry, clean area to avoid tarnishing.
Polishing and Restoring Shine
Over time, even the best-quality cutlery may lose its shine. Regular polishing can help maintain the original luster and prevent tarnishing, especially for silver or stainless steel cutlery. Here are some steps for polishing:
| Material | Care Instructions |
|---|---|
| Stainless Steel | Use a specialized stainless steel polish to remove fingerprints, water spots, and streaks. |
| Silver | Use silver polish to restore the shine. Apply with a soft cloth and buff gently to remove tarnish. |
Preventing Stains and Corrosion
One of the biggest threats to cutlery is corrosion. For stainless steel, while it is corrosion-resistant, it is not immune. To prevent corrosion and staining, here are some essential tips:
| Care Instructions | Details |
|---|---|
| Avoid Prolonged Exposure to Acidic Foods | Foods like tomatoes, citrus, or vinegar can cause corrosion if left on cutlery for too long. |
| Proper Drying | Always dry your cutlery immediately after washing. Leaving it wet can cause spots and rusting. |
| Use the Right Detergents | Harsh, abrasive cleaners can damage the finish of your cutlery. Use gentle, non-abrasive cleaners to preserve the surface. |
Storing Cutlery in Commercial Settings
For B2B buyers, maintaining cutlery in high-traffic environments like restaurants, hotels, and catering businesses requires careful attention to storage. Here are some specific recommendations:
| Environment | Storage Tips | Key Considerations |
|---|---|---|
| Restaurants | Use commercial cutlery trays to keep items organized and easy to access. | Focus on durability and ease of cleaning. |
| Hotels | Store cutlery in protective cases or storage boxes to prevent tarnishing and damage. | Consider high-end cutlery materials for a premium feel. |
| Catering | Use large bins or trays for storing large quantities of cutlery. Ensure easy transport and cleaning. | Consider plastic or other cost-effective options for large events. |
The Role of Professional Services in Cutlery Maintenance
In some cases, maintaining cutlery at a commercial level might require professional services. Many high-end restaurants and hotels work with professional cleaning and polishing services to ensure their cutlery is always in pristine condition. These services offer specialized cleaning for silver and high-quality stainless steel, as well as polishing that restores the original shine.
Proper care and maintenance of cutlery are essential to ensure its longevity, appearance, and performance. Regular cleaning, careful storage, and occasional polishing can go a long way in preserving the quality of your investment.